Showing posts with label sewing. Show all posts

Tuesday, November 23, 2010

wool gauze singlet

Beetroot wool gauze.
Slippery and prone to fraying quickly after it's cut.
In hindsight I wished I'd used 'french seams'.
I used pinking shears and zigzag instead.
The bias binding kept loosing its shape and needed to be re-cut much wider.
But it drapes beautifully and is slightly transparent which is elegant and cool to wear.
It has pretty gathers through the front and simple neat shoulder seams.
I adapted the pattern by shortening it to just below the waist with a curved hem.
Adapted from this dress pattern form my favourite Japanese sewing book.


Monday, August 2, 2010

ironing boards made beautiful


The kids think I have gone mad.

I have just spent the last ten minutes photographing my ironing boards.

But this is the weird part... until yesterday I didn't even own an ironing board.

Then out of the blue, I bequeathed two.

One was dropped off by a caring friend (and a perfectionist sewer, who probably could no longer bear to hear of my making do on the kitchen bench with a bath towel)

The other, I spied on the side of the road like a stray animal.

I thought they could be friends.

But both were a tad tawdry, so I bought one new white stoppers for its feet and hacked up an old wool blanket and made new padding for both and then went all-out, and in the space of two hours sewed up two pretty new cover for them both.
One of the prints is an Amy Butler and other an old bed sheet.
The iron looks pretty happy about it and the boards look positively energized.
I found some good tutorials here, here and here.

I just noticed the iron is called "vogue" It always cracks me up when they try to brand domestic appliances by making them sound slightly alluring and sexy. It's being borrowed from my mother in law while she's away on holiday, in the hope that the iron I own (which recently fizzed sparks and smoke from it's frayed cord) can be re-wired by a certain clever man.

I also realized that it's made with Teflon which pretty much is banned around here... not that I'm going to be eating off it, but isn't there a risk of it over heating and releasing carcinogens? Anyway I prefer to err on the side of caution, except I very much doubt one can even buy an iron that isn't coated in the stuff.

...and while we're on that note, can't they make them look cool? like funky wee animals... they do have that giant mouse look to them.. have they done that yet with a computer mouse?...given them little felt ears?

The kids must be right, except they too must be going mad because they keep asking me when they can go surfing... with my new ironing boards.

I just might be mad enough to let them.

Thursday, July 29, 2010

70's simplicity


This pattern was published by Simplicity the same year I was born.
I pulled it down from my stack of cut outs ready in waiting, and made it up in this delightful (also 70's) fabric from that (SSsshhh, it's a secret) junkshop ...in Mayfield.
I had a spot of difficulty sewing the pointed yolk to the dress front. It was very fiddly, but I threw caution to the wind, put my foot down on the peddle and went for it (top stitching away the unevenness as much as possible). I reckon that back in the day, it wouldn't have been considered very clever to 'wing it,' and precision, knowledge and technique were of the up most importance. I guess back then, we had a few tricks up our sewing sleeves, so to speak, and were generally more experienced sewers and the patterns of the day seem to reflect this.
The bow at the back lends a lovely party dress look.
She keeps talking to the dog on the front...
and is mesmerized by the graphics of pigs and bikes, flowers and little hobo folk.
I think I picked this pattern up from an op shop for about 50 cents.
Yay for cheap successes, even if you do have to 'wing it' on the odd occasion.

Friday, July 2, 2010

cut it out

Sometimes the prospect of a sit down sewing session seems like too much hard work, to intensive and requiring too much attention to detail. It's on lazy days like these when I cut out a million things instead. Then the layers of fabric and tissue sit staked on top of one another, shelved until I feel more energized and purposeful.

Other days I feel the urge to sew, but are indecisive about what exactly to commit to, which makes it more convenient to have spent these lazier days lining up projects that are all ready and good to go. Beginning can be the hardest part right?

Shelved for days when I have more drive, are the following..
A backpack with HARD WEAR...yeah!
in this laminate by Nani Iro and contrast linen by Etsuko Furuya from these folks
50's fabric from Jan Howden at the Mayfield junk shop.... SSSsshhh its a secret.
and again, good for girlie summer smocks etc

And a duvet cover for the wee lass,- which I was persuaded into, having a little too much pink in it for my liking, which I am hoping I will be able to over look in favour of the minty/mustard tones.

Thursday, June 24, 2010

potatoes and lavender

Yesterday, the 3 year old and I decided that we wanted to sew some lavender bags as gifts -from fabric printed with potato stamps and hand cut stencils.

Instead of buying specific fabric to print on, I cut up an old linen shirt- which was about six sizes too big for me.

Linen takes on the fabric paints beautifully and the weave in it suits these forgiving, organic looking techniques.
I cut some really simple stencil shapes free hand from an old soy milk container with a X- acto knife and carved up the flat side of a potato cut in half.

We mixed up two different shades of blue fabric paint onto saucers and went for it in own own instinctive way to cover all the panels of the shirt.
I got engrossed in the repetition of the potato stamp.... paint, press, lift, paint, press, lift...
For the stencils, we used a proper stencil brush -which you use in a vertical dabbing motion to prevent any bleeding of the paint under the surface of the stencil.

After we had dried and heat set the paint with an iron, we cut out some 26x19cm rectangles, including a 1 cm seam allowance around 3 sides. We opted to include some of the shirt cuff for interest and folded them in half long ways with right sides together ready for sewing.
We also made some small strap loops- kinda like bias binding, so you can hang them in your wardrobe (lavender repels moths) and on door handles (great for freshening up a stuffy room). They were sewn into the bag, with the ends extending beyond the seam edge.

Once two sides were sewn, we turned them right side out and stuffed them full of lavender that we had harvested earlier in autumn, ironed the opening inwards and top stitched it shut.

The wee man loves getting to push the foot control peddle on the sewing machine. It's got to be the next best thing to driving a car.

Also, just so those of you with children don't get the wrong impression, this was done over two afternoons- the printing on one day and the sewing the next. It's important to have realistic expectations and outcomes, especially when you're crafting with kidlets!

Et voila!
The printing resource book. You can get it here or here
Nothing nicer than falling asleep with a hottie AND a lavender bag in your pillow (it will exert a soporific effect)

... MMmmm bliss

Wednesday, June 16, 2010

birdie sling


Amy Butlers 'Birdie Sling' comes highly recommended.
It's a beautifully designed bag with wide contrast strapping, a big tear drop shaped body and two internal pockets. The pleats on the exterior and the interfacing of the bands and handles make for some satisfying sewing. With its modern styling and dynamic proportions, I know I'll definitely be making more.
I bought the pattern on line. You can get it here here and here.
The fabric I used for the outer main body, is a floral denim I found at Global Fabrics quite a while ago. It reminds me of the lupins through the Lindis pass in summer or a Monet painting in macro. I lined it in a baby blue cotton and used a dark navy denim for the bands and the handles. What have you been making lately?

Friday, June 11, 2010

homage to hotties


Hotties are god sent.
In times of need and distress they soothe and comfort.
In winter they warm our beds and our bones and all year round, the bassinets of our babies.
There is nothing more thoughtful or romantic than to slip a hotty into the bed of an unsuspecting guest or lover.

There are however, both good and bad things to be said about hotties.

Brand new hotties can be very stinky in a toxic kind of way. The best hotties therefore are the ones that are snaffled from grandmothers cupboards, their smooth skin having stood the test of time between flanettettes and flesh and lay waiting to be held tight once more. Or failing the ability to snaffle them, do check the new ones you are buying fit the stardards required here.

There are also tricks to filling hotties. My mother showed me how to pour the water in slowly so it doesnt spit back at you and how to burp the air bubble out of it at the end.

A good hottie needs to be at least half full, but no more than 2/3rds.

A hottie filled with boiling water will need to be wrapped inside something so it wont scold the skin. It will radiate its warmth for a good 6 hours or so.

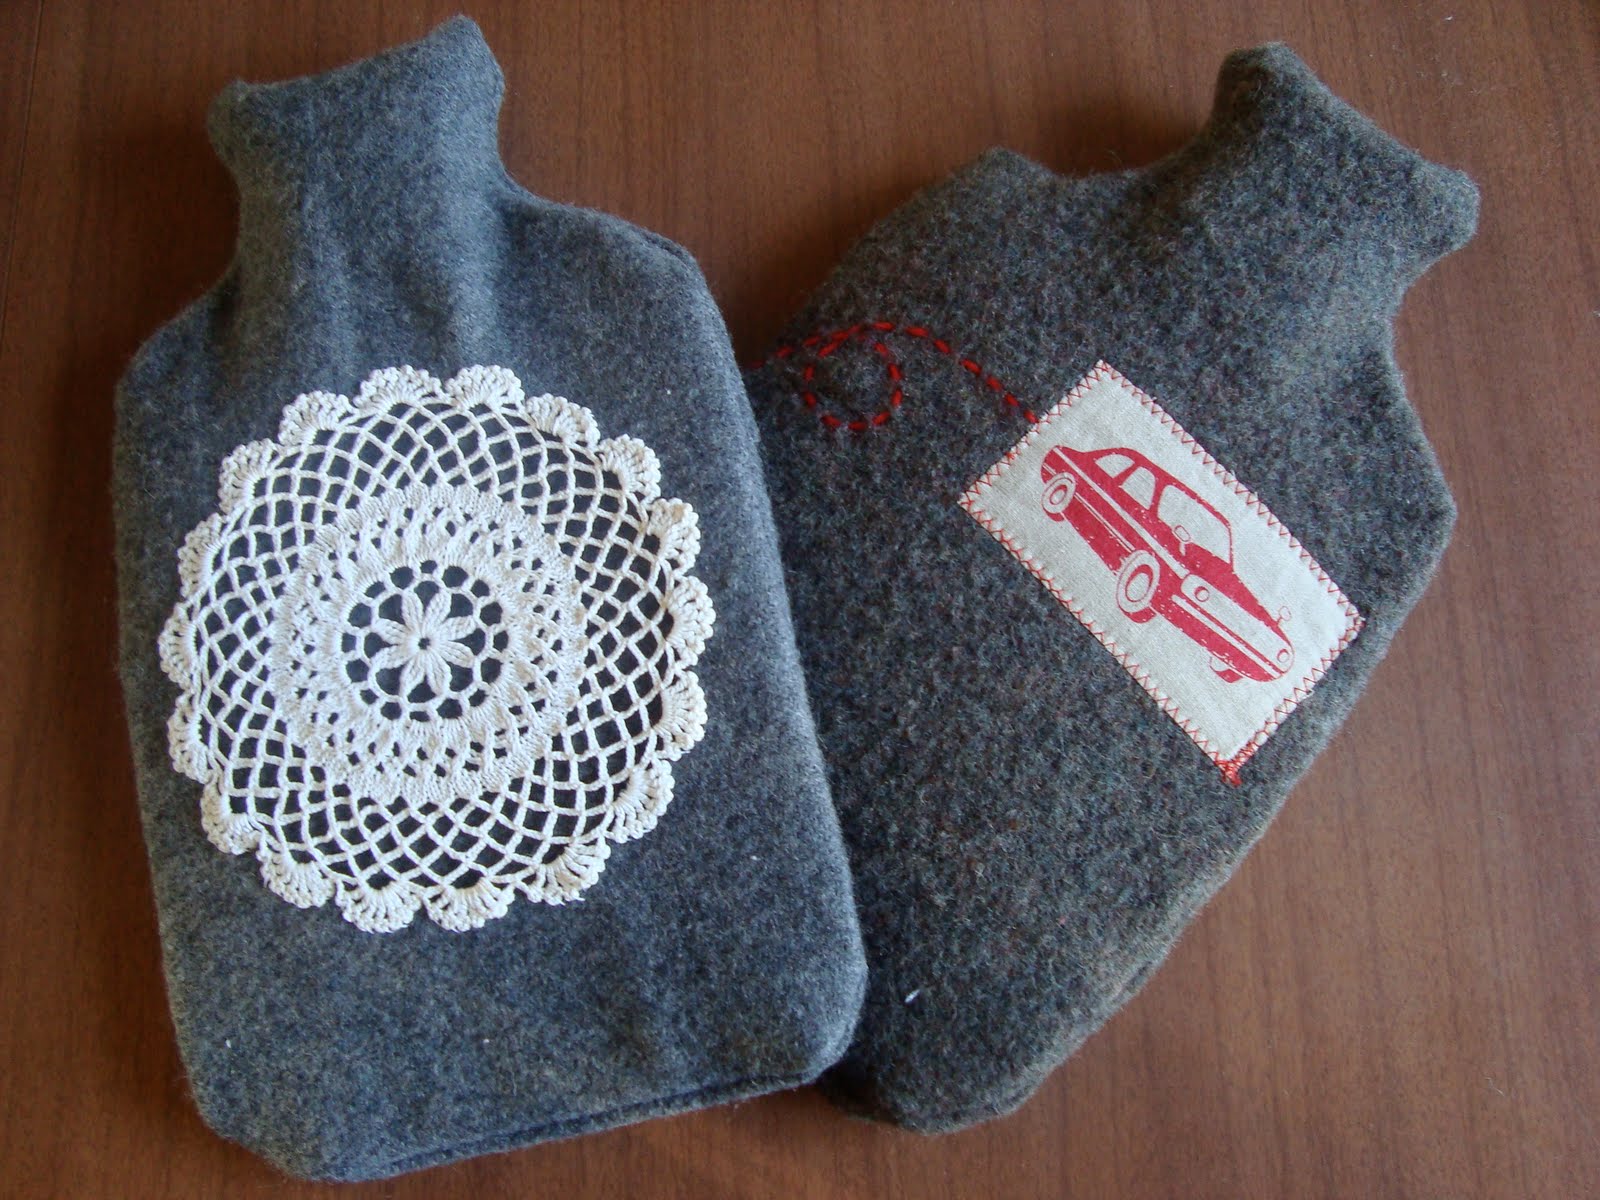
Thankfully hotties still seem designed to a fairly universal standard. Which means that any hotttie cover you make will generally fit any hotty.

Here's how to make a basic hottie cover...

Lay your hottie out and draw around it leaving a good inch extra for seam allowance and ease.
Fold your pattern piece in half long ways and trim or reshape it to get it looking nice and symetrical.
Open it back up and cut this out in your choosen fabric. This will be piece A of 3 panel pieces. You can decorate this piece before or after you sew the hottie cover up, depending on how fussy you are and what you are adorning it with.
To make an opening to slip the hottie inside, you will need to overlap the 2 back pieces B and C. This is done by firstly folding the pattern in half and making a crease line.
Open it up and mark this crease with a pen. Then make another crease line on your pattern half way between the first crease and the top sholder curves.
As you can see, panel B will run from the very top of the hottie to the half way crease.
Panel C runs from the bottom of the hottie to the highest crease line.
Cut out both panel pieces B and C as shown from your fabric.
When you are ready to sew the hottie cover up, lay the 3 panal pieces right sides together with panel B in the middle. I used the blanket stitched edge of an old blanket as a feature of the opening. You can use any machine, either over locker or straight sewer or if its felt or felted wool your using you could probably just hand sew it together.
We were formerly using pillows slips to house our hotties in. The kids would drag them along the ground in the mornings, as if there was some stone cold blubbery dead thing inside that needed to be buried. I was worried the pillow cases would eventually rip or the hotties might burst their seams. Countless times, I have stumbled out of bed and stood on a tepid, cast out hottie, narrowly avoiding a small tsunami. Perhaps we are lucky but of all my years of accidentally standing on them and watching the kids do the same, we have yet to break an ankle or witness a hottie bomb go off. I imagine it would explode rather like a wet whoopy cushion.

I wonder...

Do hotties get mouldy inside?

Does anyone actually prefer a wheat bag warmed in the microwave?

I'm a hottie girl hands down. But I'm interested in your thoughts.

It's like talk back radio here today.

Tuesday, June 1, 2010

unruly

She has such unruly hair - not behaviour, thankfully... at least not today. Not from her anyway.
Like that of a mohair goat, sometimes frizzy curly, other times ringlet curly... but never tidy.
So, after much experimentation with all sorts of silly hair accessories and much worrying about where they had gone and whether they had been ingested or not, I've decided to give these homemade Alice bands a shot. They seem to be doing the trick so far.
We will cross our fingers and hope we don't have to cut her some weird curly fringe thing to keep these curls with a mind of their own out of her big blue eyes.

Wednesday, May 19, 2010

kindy bag

I made "The Big Kindy Boy" a backpack to cart his Scooby Snax and spare undies around in.
I added a cool car to it as a clincher and hopeful insurance against the likelihood of some bad ass little snots out there suggesting to him homemade ain't so cool.

The straps pull through drawstring style and there's a simple front pocket I divided into two, where he can stuff his stolen crayons and crusty play dough projects.
I have sewn from this book several times since buying it.
Very straight forward, easy to follow and jam packed with sweet ideas.
But then Lotta is a total talent babe and oozes all that Swedish Scando style.
He doesn't usually look like a ghetto kid, least not from the front! And he doesn't really steal crayons. That was me.